28.12.08

Fuck Santa!

If Santa exists, he has very weird sense of humor. It was the christmas day evening when I had the chance to open the box and check all the stuff.


Everything seemed fine... at first. Then I realised that the 140mm HDD fans were not what I thought them to be. That's just my bad for not checking it out. Instead of having one 140mm fan, the coolers have two 60mm fans. I'll try them if I can use them or not. But that's not critical.

What's critical is the situation with the MoBo. I know there are risks in buying open box items, but I called the retailer and asked if the MoBo has all the accessories and stuff with it. They said "yes" and I was happy with that. I opened the box to realise that there's no driver DVD, no LCD POST screen and the optional fan was missing. The box says something about 3Dmark and Kaspersky, but the only disk I could find was the STALKER. The user manual also says something about SATA power cables. Can't find them either.

Also the waterblock for the GFX card causes a bit of trouble. It does not have fittings. I need to go and get them later.

With all this hassle I decided to give the parts rhumba a rest and wait until the retailer calls me (or I call them, which ever comes first). I try to get things settled and unless they can send me the mobo stuff, I have a cunning plan. I'll demand refund for the CPU and MoBo and invest that money to i7 920 and EX58-Extreme. makes about 300€ more, and I really need to think hard about this.

22.12.08

Christmas time is here!!

I got mail this morning and THEY'VE FINALLY SHIPPED MY COMPUTER!!!

The parts should arrive tomorrow, but unfortunately I'll be at work and can't pick them up right away. Luckily the post office is in the local grocery store and it'll be open from 0700-1300 on chrismas eve. Yes, I will be behind the doors at 0655 to pick the stuff up.

I'm beginning to think that Santa really exists...

16.12.08

Frame nears completion

I got the frame from sandblasting on friday. It was also painted with primer, so all I have to do is wipe off the dust and spray on. Very nice job. I have to thank that guy from our paint shop and propably get him some nice christmas present. It was all a freebie for me.

I'll also get the rubber plates today for the cover and maybe some nice corner decoration lists if I can find any.

Still no sign of the parts....

2.12.08

Like a little boy I'm waiting

But I'm not waiting for christmas. I'm waiting for my motherfucking computer parts!!

I called the retailer today to "celebrate" the start of the third month since I ordered the parts for El Jefe. They still cannot take the card from the shop inventory and give it to me. That's because there's still some poor soul who has waited longer than I have. Well, good luck to him/her too! I'm starting to think if the wait really is worth the 80€ the card price has gone up since I placed the order.

They offered me to have a card from another manufacturer, but a stubborn ass like me can't be pleased with that. I want what I ordered and I want it in my lifetime.

After a lengthy discussion about my options I decided to wait a little bit more. Their supplier is getting some cards on 11th and the retailer gets theirs probably on 12th. So there's light at the end of the tunnel (I hope it's not a train). My computer should arrive on 15th or 16th. That's two long weeks...

Then some thoughts about the frame.
I may have time to work with the frame on sunday or the next weekend. I decided to drille the holes after it's been sandblasted and painted. The color i'm still keeping as a secret.

To do list:
- radiator and fan mounts
- measure and cut cover panels
- exhaust grills
- handle mounts
- sandblast the frame
- paint the frame
- drill holes and tap them
- mount covers, handles, wheels etc.

These I can do only after the parts arrive:
- test water cooling setup
- mount water tank (may need a holder to be made)
- install windows
- install lights and other electronics

That's about it. I'll put an air cooled setup in an old case the day the parts arrive and test if the parts work. Installing and building the final version is scheduled after christmas and "It" should come alive just before new year.

26.11.08

Some new stuff, but no sign of the main parts

On monday night (2030 my time) I ordered some cold cathode lights to replace the LEDs I was unable to find. The package came in today (about 1100 my time)! 38 hours from ordering and that's what I call fast. You can't actually get faster without using a courier. Have to test them on my old rig today and post pics then.

The other parts, which I placed an order on October 2nd are still to come. The GFX card seems impossible to take out form the shop inventory and place it in to my order. I'm hopeful though, because their web page shows now that something has happened. Yesterday the saldos were -6 for the websales and +2 in shop. Now they show -5 for web and +1 in shop. I'm waiting for the e-mail confirmation today or tomorrow. Otherwise I need to phone them again and act disappointed.

21.11.08

The project is not dead

I am still waiting for my graphics card to arrive and haven't got time to visit my "lab". That's why the lack of updates.

They have the HD4870x2 TOP model in stock, but the prices have gone up so much since I placed my order that I'd have to pay more that 100€ extra to get that card right now. Not going to happen.

I have however asked if I could pay the price difference between the vanilla model and TOP model. No answer yet and I think the answer is going to be something like "sorry, no". The vanilla model was supposed to arrive last week.

In fact I just got off from the phone from their web sales department and I really hope for some progress. Their webpage tells that they have 2 of the vanilla version in their "offline" shop. So I called them and asked to pick one up and put it in to my order and send it to me. I got "I'm not sure if I can do that. Our saldos would get screwed, bla bla bla..." The sales girl also told me that if they'd take stuff from there it'd go as first come - first serve basis. So I asked "You have orders older than mine over there?" in a very suprised tone ;)

This might've done the trick, because she immediately said that she'll look into it and try to get my order in mail on monday.

WOOOT!!! \o/

11.11.08

I made a mistake, but then I realised that I was wrong

The visitor stats a few posts back were not accurate. Well, they were but they were only the stats of the last 4 weeks. Here are the stats from July 1st - November 10th.

Visits by country:
1. Finland 270
2. Norway 36
3. United States 30
4. Sweden 21
5. France 9
6. United Kingdom 7
7. Canada 5
8. Germany 4
9. Greece 2
10. Romania 2
11. Switzerland 1
12. Spain 1
13. Poland 1
14. Malaysia 1
15. South Africa 1
16. Bangladesh 1
17. Estonia 1
18. New Zealand 1
19. Belgium 1

Total visitors 395

Visitor loyalty:
1 times 327
2 times 32
3 times 13
4 times 6
5 times 4
6 times 3
7 times 3
8 times 1
9-14 times 6

So it's safe to say that there are about 20 people interested in this stuff and about 350 who just followed a link. Nice amout of visitors anyway IMO.

Thank you all!

By the way, I have come up with another case modding project idea, but I'll tell about that when I get this one done.

4.11.08

Progress with the frame and part problems

I ran into some problems with my parts availability as said in the previous post. On top of that they could not get the Nexus Prolong and the LEDs. I checked another shop for the LEDs and the same thing. Seems like red or white LEDs are not used in here for modding. Blue, amber and green are the only options. Darn! I hope I can get used ones from some guys at tehomylly.net forums.

BTW, the GFX card price has gone up again. I paid 430€ for that ASUS and after that they put the price up to 460€. Yesterday I checked the price again and now it was up to 499€. Gee-wiz! I'm making profit here!

Last weekend I managed to get some progrees in the frame. I got the wheel mounts done and also got the brackets for pump and "water tank" in place. Then I grinded all the welds done previously.

Here's one of the wheel mounting bits cut to length.


Then I grinded some chamfers to get better welds and less material to grind. I also grinded the corners because i need to mount one corner of the wheelbase over there too.


Welds done and the mounting piece in place. Pretty as a picture!


Mounts in place and corners grinded. All I need now is to grind the mounts flat and drill holes for the bolts.


The test fit of the pump and decoration tank mounting brackets. After grinding the paint off, I did small grooves in the ends so the brackets stay in place nicely and would be easier to weld.


Welds done.


All grinded and smooth. I need a new disk for my grinder now :)


Test fitting the pump and the decoration tank. Looks good to me.


Another view. I still need to make the mounting bases for those, but that's an easy job and will be done next time.


Testing the handle mount. I need to make spacers for those so they'll come on top of the cover plates. Short pieces of some tube should do the job. That's also for next time.

28.10.08

A minor setback

I just got a call from the company I've ordered the parts from. They said that there were couple of items out of stock and they won't get them anymore. I got things settled with them pretty ok, but there is one big issue. The ASUS GFX-cards have delivery problems. Even their supplier does not have those cards. Seems like the problem is at the ASUS factory and it will take estimated 2 weeks more to get them cards to my retailer.

The good point in this is that the card i'll be getting might be some 2nd generation über sample that will OC like crazy and would not generate excess heat at all.

HA! I wish!

16.10.08

Some visitor statistics

I never thought this project would attract a lot of people and now, as I think the project is in the half-way point I'll share some of the visitor stats with you. To be honest the total amount of visitors is a bit less than I thought it would be. Nevertheless 58 different visitors is pretty good, considering how many people know about this.

The stats at the time this is published:

VisitsAmountPercentage
1 time5375,71 %
2 times45,71 %
3 times45,71 %
4 times34,29 %
5 times22,86 %
6 times22,86 %
9-14 times22,86 %


Thank you all for visiting. I hope you've enjoyed your stay. Stay tuned, because there's still a lot more to come and now the real work is about to start. Putting together the actual computer, installing the water cooling and finishing the case; that's a lot to do and I hope the project would be ready before new year.

One more thing. Please, please comment on the posts. I've had 5 comments all together so far and I think you people have something more to say about what I'm doing. There's no such thing as bad feedback. I promise I'll answer to every comment.

15.10.08

A little progress with the frame

I had about 2 hours to make some progress with the case. You should never work in a hurry and I'll show you later what happened. But first something else.

I placed the HDD rack in the frame and tested the bracket fit. Fits very nice.


Then I bought the wheels for the case from a hardware store. Wheel diameter is 75mm and the overall height is 90mm. That handle on the right side wheel is brake, so the case won't wander around if I don't want to. The wheels with brakes also turn 360 degrees, so if I ever need to move the case, it should be quite easy.


Fitting the wheel. I need to make 3mm thick fitting plates for the wheels and drill holes for the bolts. That's something I'm going to do probably next time.


Here's my new radiator on top of the fan mount. The mount and the distance between the fans is a little bit bigger that my radiator is. Seems like I have to build some kind of box to guide the air and hold the rad. On the other hand I can also fit the three 140mm fans I ordered to the box too.


Here's the stainless steel mesh I told about. I think it was part of some kind of washing machine. There's plenty of mesh to work with. I'm going to make the exhaust and intake grills out of that. All I need to do is cut it and polish. See, there's two handles too. They were a nice bonus. I'm going to put them on too. This may have been the best and most useful buy I've made in my scrap yard hunting trips.


OK, here's the thing I messed up in the hurry. That thingy is supposed to hold the PSU and the MoBo mounting plate. I didn't have time to grind the welds, but I may have to redo that all over again. The MoBo plate holding frame is twisted. I don't think you can see it from this pic, but I welded the top and bottom bars tilted. Their distance is OK, but the center ends are 5mm(!) lower than the outer side ends. I can't understand how that could've happened. Maybe I just looked the measure tape wrong in the hurry. It could be fixed but then I'd need to take the PSU plate off also and that seems like too much work since the MoBo plate is going to cover the whole frame anyway.


Here's the opti-drive mount. Welding a thin part to a thicker part is not very easy and I might need to fix that bit after I've grinded the excess off. I also put another bracket on the mount to stiffen it. Before that it was very wobbly and prone to resonate in use. That should be fixed now.


Here's how the drive, PSU and MoBo line up. That looks good to me. The PSU has it's own exhaust in the back of the case, so no more hot air than I already have should come into the case. I thought of having an air duct inside the case to have all the exhausts in the same place, but I chose this easy solution. Just a hole on the back where the juice comes in and the hot air goes out. Simple and effective.

9.10.08

Parts ordered

Now it's all or nothing. I've ordered the parts and there's still some stuff for the case to be done. That shouldn't be a big problem, because that delivery time might be as long as 3 weeks if they don't have all the stuff in stock and they have to order it from somewhere else. That means I should be firing it up in the beginning of november.

Here's the list of parts I ordered. I'll post the complete list of stuff I got for this project in the conlusion post later.

LG DVD+- RW DL LightScribe 20x
Nexus Prolong
3x 140mm fans
2x Samsung 1TB Spinpoint F1
2x Lazer white LED
A-data 4GT DDR3 1333MHz+
ASUS EAH4870X2/HTDI/2 HD4870X2, 2GB
Intel CORE 2 DUO E8500
EK-waterblocks EK-FC4870 X2 CF acetal for GFX card
APOGEE GTZ CPU block
PC Power&Cooling Silencer 750 Quad (Red, Crossfire edition) PSU
Windows Vista home premium 64-bit, UK, OEM
Total cost 1538e (incl. S&H)

On top of that I got stainless steel mesh from scrap yard (@20e) and I also bought wheels for the case.

Let's see what I can do for the case this weekend.

25.9.08

Making the hard drive rack

I did this two weeks ago, but I was too busy to write anything until now. Here I make the rack for the hard drives. I'll be having only two HDDs but there's room for two or maybe three more.

After cutting the pieces to length and grinding the paint and rust off the welding surfaces, I used those magnets to hold the pieces together so I could snap a small weld to hold the pieces together and then finish the joint. With the first part I made a little mistake and welded the top side first. When the weld cooled down, it also shrunk and pulled the piece off the intented angle.


The next piece I welded on the other side and it didn't bend at all.


Here's how much the rack was twisted.


Then I clamped the piece down to the table and used the magnet to hold the other rail in place. This way I got it as straight as possible.


I welded the top sides too and then grinded the excess material away to make the base straight and nice.


Here's the rack ready for test fit. I had to put it into a vice and twist it a bit to make it straight. It's not perfectly straight, but good enough for now.


HDD in place with the padding. Fits like a glove. I'm going to cut the padding a bit so the drive sits there nicely and doesn't bend the padding that much.


I took the padding off and here's how much room there is on each side. I'm pretty happy how this turned out. Later I drilled holes on each side of the rails for the M6 thread bars. I'll have a padded bracket on top fastened by wing nuts to hold the drives in place.

18.9.08

Got the MoBo

Good news for the project. I gor ASUS Maximus Extreme from online auction at 185e! That gives a bit more room for my budget.

17.9.08

Harsh reality

The text became longer than I thought. Bear with me. I've also added a link for the pics in the previous post.

The project is now at point, where a lot of things that needs to be done on the case before I can even think of ordering the parts. I could order the parts in advance, but the money gets to me in early December, so I have some time to finish the case.

Let's talk about the parts before going into the case modding issue.
Two weeks ago I posted the latest parts list and some time after that I got mail from the taxman. It says that I'm getting about 1500e refund. It's half of the amount I expected, but hell of a bunch of money anyways. That money is the main funds I have for this project. I can ofcourse use a bit of my savings, but I'd rather not put too much of them in here. The budget means that I cannot go wild and get all the extreme stuff I talked about before. I have a rough outline of the parts I need and with all that, the money I'm going to spend is around 2k. I'll post the list later on. I just have to hope for a drastic price reductions :) We'll see what happens.

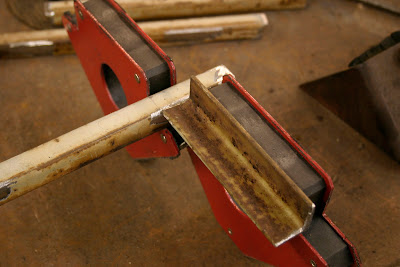
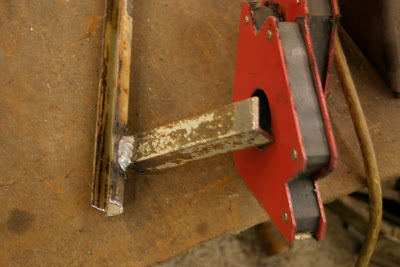
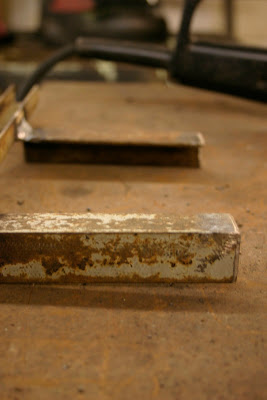
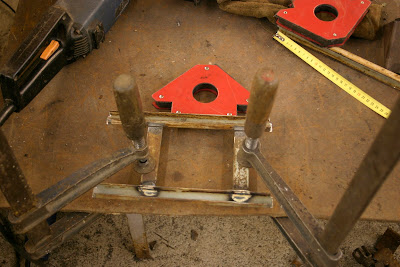
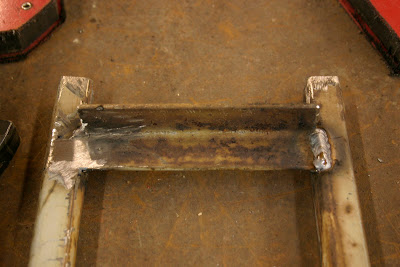
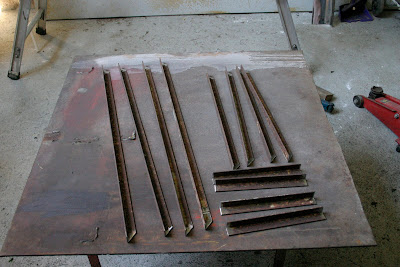
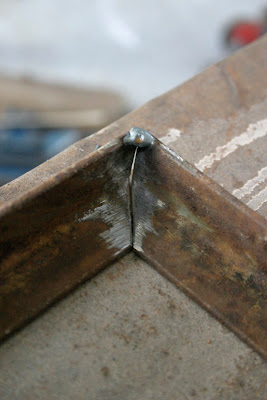
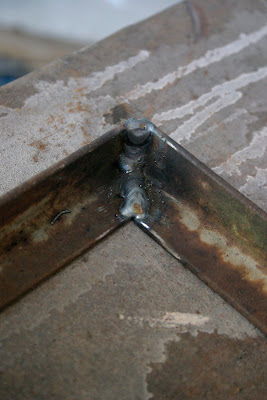
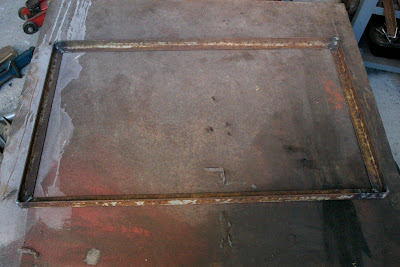
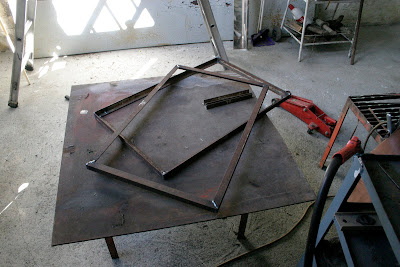
Then to the case modding. Last weekend I visited the farm again bout I was too busy fixing my car, so I couldn't do much for the case. However I spent some time placing the parts inside the frame and doing some sketches. I realised that I need to mount the stuff inside the case somehow. Not that I didn't know this before, but as I was trying different places for stuff I thought "how the hell is this going to stay there when this case is upright?". So back to the drawing board. This time I used good old pen and paper, so the drawings are a bit... impressionistic, should I say. I'm not going to put them up here, unless I get to draw them again with computer.

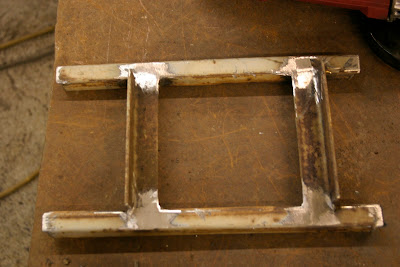
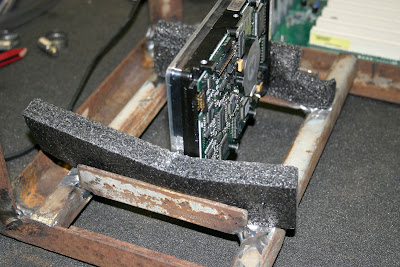
The final outcome of all this? The HDDs are going to be mounted vertically on a padded custom rack at the bottom, the alu tank and the pump also get their own pedestals. The PSU will be screwed on the ripped PSU plate welded on the frame.


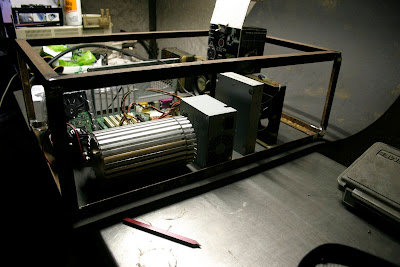
Side view. Seeing this made me to rethink about my relationship with plexi and leds. Before I really did not like them too much and everybody is using them, but they should bring out the tank very well.

As for MoBo and optical drives I'm still thinking of the best solution. I think I'm going to fabricate a padded cradle for the optidrives and weld it on the frame too. The MoBo is a different thing. I'm still pondering whether the mounting plate should be fixed or removable. There are upsides and downsides for both ways.

If the plate is fixed, the design is easy and will not resonate much, but the assembly and upgrades are a bit tougher. Especially with the water cooling installed, I just can't flip the case on the side to get my hands on the parts.

If the plate is removable all the stuff I need to do on the MoBo becomes very easy but I need to find a way to make the design simple and resonation free. Some padding here and there kills the resonation, but the design still awaits for my discovery.


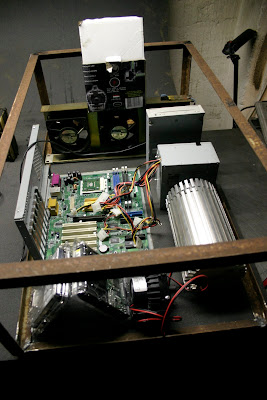
Front view. This setup looks pretty OK to me.

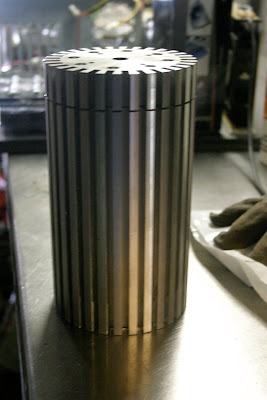
I'm also going to scrap the radiators I bought earlier on and buy a factory made one. The Ibiza rad is aluminium and the other is copper. That copper rad might be too small to handle all the heat so I'm getting one large one. The fans I had from my dad's stash are fixed on a frame. I just need to put in some guides for air because the fan frame is not as big as the overall frame. Mounting the radiator on the fan frame should be piece of cake. I'm still thinking of getting some ordinary 120mm 12V case fans instead of those industrial grade 120mm 230V fans mounted in there.

Since the shit hit the fan with alu/copper corrosion and I decided not to use my tank, I've got another idea. It would be terrible waste to throw the tank away, so I decided to get a pastic tank and fit it inside the alu tank. Then I'm mounting the tank inside the case and putting some plexi and a led to show it off.

Plexi and leds were not considered to be used in this project initially in my plans. The initial plan was to cover the entire frame with thick rubber plates and mount the alu tank outside. After trying the tank inside the case, I thought it'd make a nice flavor to it. Also the rubber plates I planned to use look so worn out that the case would look like crap. Therefore I'm going with that neoprene stuff pictured earlier. It doesn't look so porn as black rubber, but what can you do? The good thing is that I can replace the cover plates later, if I get my hands on some good porny rubber ;)

At this point I'm thinking if I bit more than I can chew. I'm not worried about the parts or budget but the case. So much work and after finishing one part I find out that I need to do two more that I wasn't even aware of to make things work. Well... such is life.

3.9.08

Second thoughts

My friend asked me to build him a computer that costs about 1000€.

We ended up with this:

MoBo: IX38 QUADGT S775 IX38 DDR2 SATA2
CPU: Intel CORE 2 QUAD Q6600 2.4GHZ
MEM: A-Data 2GT DDR2 800MHz
GFX: Sapphire Ati Radeon HD 4870 512MB, PCI-E,GDDR5, Dual DVI
HDD: Samsung SpinPoint 3.5" 750GB SATAII 32MB 7200rpm
DVD: Samsung DVD+-RW Dual Layer, SH-S223F/BEBN, 22x8x48x, SATA
PSU: Corsair 620W 620HX ATX2.2
Antec Three Hundred Ultimate case
MicroSoft WINDOWS VISTA HOME PREM 64
Total cost at delivery: 1146e

Without any OC'ing I got 3dmark06 score of 12200 something. Then I pushed the GFX card to 790/1000MHz (or what ever the Catalyst Control Center allows) and set the CPU to 2.8GHz. The score was little bit over 14000. I think there's still room to OC the CPU quite a bit. By replacing the stock cooler it has right now I think 3.5GHz+ might be at reach.

Which makes me think about my choises for my new computer. Maybe crossfired 2Mb 4870x2 is a bit overkill??

I tested BF2 with the highest settings at 1600x1200 75Hz and got constant FPS over 90 about all the time!!! FPS never dropped under 80. I'm going to test FH2 tonight and see what I'll get....

Maybe I just need one 4870x2 for starters...

Here's link for the assembly photos.
...Clicky...

1.9.08

The new setup

I've pondered the options I have and came to a conclusion that this setup will be the one I'm aiming for. If only there were HD4870x2 watercooled GFX cards available for me...

CPU: Core 2 Quad Q9550
MoBo: Asus Maximus Extreme
HDD: Samsung 1TB Spinpoint F1, 3.5", SATAII/300, 32MB, 7200RPM
MEM: A-Data 4GT DDR3 1600MHz+, Extreme Edition Dual-kit
GFX: 2X Asus Ati Radeon HD4870 X2 2GB
PSU: Corsair 750W ATX2.2
Apogee GTX Extreme CPU waterblock

Total cost about 2150€

The price is ridiculous but there's still time for the prices to drop.

29.8.08

Something about the hardware

As most of you might have noticed there has been some interesting twists in the GFX-card business. So now it seems that I'm going to drop those GeForce monsters and get them nice ATI HD4870's instead. Actually I'm thinking of getting two 4870X2's. If only I could get my hands on those OC'd watercooled behemeoths. Sadly them bastards are available only as OEM for selected manufacturers. I wish I could be a selected manufacturer. Here's some links for your enjoyment.

[H]Enthusiast
TGDaily

Then the CPU business. It's just my luck that the Nehalem is coming out pretty soon. Everything was sweet and constructed when I was thinking of the hardware configuration but now the new options have messed up my pretty plans. I was pondering whether to wait for Nehalem or not. After reading some previews I decided not to go the Nehalem way. Here are some links upon where I based my desicion.

Andandtech
Adrian Kingsley-Hughes
Hexus

So where am I going to hardware-wise? Seems like I have to give up my "No compromise" -mentality once again. That means I'm getting good price/performance CPU, top of the line MoBo, DDR3 memory (their prices have dropped nicely in the last months and I just might be able to use them in the next setup (hoping to upgrade only CPU nd MoBo then). I'm also backing off from the "99%DIY watercooling" -principal for this machine. I'm still trying to make some waterblocks for my older rigs to get the experience, but that's not part of this project anymore.

Then something else

I have no clue about how many people read my stuff here or even what you think about it. I've had a few comments but I'd most certainly like to see more. I need that feedback and you are the people able to provide it so please comment. Any comment is better than no comments at all.

24.8.08

Building the case pt.2

Now I needed to put the endframes together. First I started to grind off the rust form the ends and frame corners like in the previous phase.


Then I grinded the sharp edges off from the corners so thet the connecting pieces would fit nice and tight. There was a gap between the ends but it diddn't matter because the connecting piece would go over it and would be welded on the frame.


We laid the other frame on the table and clamped it down so it wouldn't move and working and measuring the corner pieces would become much easier. We pre-welded the pieces slightly with a right angle and then measured the distance between one end and the others. We also measured the cross distance and after some bending and more measuring everything seemed to be right. Then we fitted the other endframe between the connectors and checked the angles before finishing the welds.


The outside joints were grinded clean too, so I could see If the frame welds were OK and If I needeed to strenghten them too. There was only small gaps and I decided not to put anything on them because the cover plates would fit better. The corners we about to come quite strong and I didn't want to grind all day (altough I love to see the sparkles fly :D ).


I also welded the inside joints to make the frame as strong as possible. It only has to support the frame itself, the water cooling parts and the plates, but better safe than sorry. I bet that frame could actually take a small car, but I'd rather not test it.


Then I grinded off all the excess material from the outside welds. At this point I congratulated myself for not doing the endframe corners and doing the connector welds quite small and neat.


One of the finised connector welds.


That's me wondering "Did I really do this and not screw up on anything?"


Here are the tools I used to make the frame.


And here's the half-finished frame. I still need to install some support beams for the drives, water tank, radiators and stuff, before I can go and have it sandblasted and painted. Then some netting for the air intake and exhaust need to be cut and installed. After all that is done I can mount the cover plates on and I think I'm going to have a killer case here. The measures of the frame are 81x52x26cm if I remember correctly. That CD-ROM is there just to give you some scale how big it is.

3.8.08

Building the case pt.1

Before going to the case building business I'd like to thank my friend for finishing the water tank for me. He finished it before that friday in the previous entry but I had no time to test it. It still looks quite cool, don't you think?


Then to the case building. First I took measures of the preliminary layout I had on the table and cut the L-beams to size. After cutting I polished the rust off the ends so that they would be easier to weld and the weld quality would be better too.


Then I had to ask my dad to be the extra pair of hands for me. I might have been able to do the case frame by myself, but having someone holding the pieces together instead of clamping them on that makeshift table of mine sounded a way better idea.

First we put just a little drops on every corner so we were able to adjust the frame pieces before welding them together. This part was painstaking, because all the corners had to be totally right or the frame would become warped and the covering plates would then look very ugly. After a lots of measuring and bending with comments like "Are you sure about that?", "That's not going to work" and "Seems like you've learnt something", we were ready to finish the frame parts. Luckily I had cut all the pices at the same length within 1mm. If there'd been bigger difference the process of putting the frame together would've been impossible and I'd still had to cut them to same length at some point.


We welded the opposite corners together so the warping would be minimal.


First part ready.


We also welded the other side to make the joint stronger.


Both ends ready. The next thing was to put them together and that proved to be a bit more difficult than I had thought. More about that in the next entry.

29.7.08

Case planning

It's been a while since I updated the project log, but I've been so busy with my holiday starting and all that.

Now I've had a little bit time to lay out the component palcement within the case and scavenging the materials. I hope I can start welding the case frame together tomorrow.

My friend working in another machine shop promised to finish the water reservoir for me. It should be ready for testing by the end of this week. I really hope it's ready before friday.

I went shopping for the nipples and tubes and all that. You can't imagine how hard it is to find a nipple with 1/4" thread. I wish I had not made the threads yet so I could make the 3/8" threads instead. Now I have to use fitting parts until I get to drill and make the bigger threads for my tank later on.

I also recovered another radiator element from a scrap metal yard today. I'm trying to use them both if they work ok and I get the airflow right.

Here's my initial plan for the component layout.
Blue = pump
Red = PSU
White = DVD-ROMs
Purple = HDDs
Green = MoBo
Light blue with circle = LCD display
Light gray = radiator
Gray = water tank


The stuff I'm going to use to cover the case turned out to be neoprene or something like that instead of rubber. It's going to work out ok if I can't get the rubber I was planning to use but I'm going to go through my dad's stashes to see if he actually has those rubber mats I remember he had.

A closeup of the covering material.


Here are a few shots of the component layout for my measurements. The case frame seems to turn out as 500x800x250 mms.


Then I found some industrial grade fans working at 230V. I have to test them out if they're silent enough.


After throwing the parts around I came out with this solution and I think it's going to be the one I'm sticking with.

The longer radiator is going to be parallel with the smaller rad. The swiftech box represents the LCD display and the box left of the PSU is the DVD-ROMs. I need to think about the airflow for the radiators and how I'm going to control it. Maybe a piece of sheet metal to have the air go where I want it to go does the trick. I have to test it when I get the frame together.