15.1.09

Frame finishing

It took whole moday evening of work, but I think the El Jefe case is now ready for assembly.

What I did was to drill the mounting holes to the cover panels and the motherboard backplate.

I pre-fitted the fan mount and the backplate.


The fan mount was OK, but I somehow managed to drill the backplate holes somewhere else than where they should have been. So I clamped the plate on the frame and drilled new holes. After that I had to grind the holes so it would look even a bit more decent and remove the sharp edges.


I set the damping plates under the frame and punched holes so that I know where to drill.


I bolted the drilled plates on for measure, so I could cut off the excess and have somewhat straight corners.


With the wheels on, I have this much of ground clearance. I will have more, because the rubber plates are not as long as the damping plates.


I used wood drill to drill the holes in the rubber and it worked very well. I should've started the process doing the back plate first, but unfortunately I made the front panel first. After I did that I realised a better way to measure the places for the holes to have the rubber tight and straight.


So I just might need a new front plate. I'll find that out after I bolt the plates on. I decided to use the original end plates because I got an idea to make the corners look good without decoration lists. I got some nice 40mm wide black plastic tape and I'm going to use that for the corners.

I also polished the grills. I didn't go for mirror finish, but I got all the dark spots and scratches off.

After all the panel work was done I was ready to paint the frame. Unlucky for me that the paint had stuck inside the spray can. I could not hear the rattle when I shook the can and all that was coming out was a colorless spray which didn't even feel sticky. So I had to delay the painting to another day. Yesterday I got to a proper paint shop and got a decent can of red paint. Just after maybe 15 minutes the can was empty and my parts were painted.
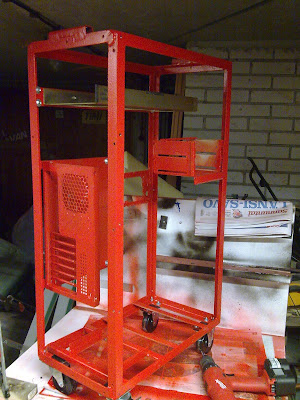

Now I'm ready to build the radiator mount and replace the 120mm 230V AC fans with 120mm 12V DC fans which I bought from Tehomylly.net forums. The Scythe fans were a bargain at 12€ each. I'm going to use the packaging foams for the radiator assembly, because they're light, easy to work with and I have plenty of it.
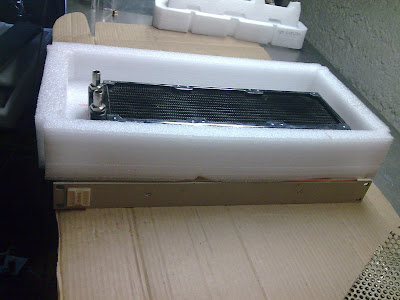
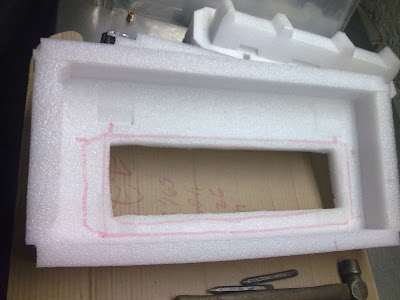


I used the plastic tape to strenghten the foam. I'll be putting the foams, radiator and fans on next time I get to work with the frame.

I should be ready to test the water cooling this weekend later.

8.1.09

Updated to-do list

To do list:
- radiator and fan mounts almost done
- measure and cut cover panels I need to have 2 new panels because measure error, heh heh
- cut exhaust grills
- polish and mount exhaust grills
- handle mounts
- sandblast the frame
- paint the frame
- drill holes and tap them
- mount covers, handles, wheels etc.
- mount water tank (may need a holder to be made)
- test water cooling setup
- install windows
- install lights and other electronics
- last minute fiddling

Initial benchmarks

Everything at stock settings.

3DMark05
22080 3DMarks
15889 CPUMarks
ORB page

3DMark06
3DMarks 16039
SM 2.0 Score 6855
SM 3.0 Score 9354
CPU Score 2942
ORB page

3DMark Vantage
P10926 3DMarks
6385 CPU Score
14321 Graphics Score
ORB page

furmark


CPU maximum temperatures were 71C and 67C. Idle at 43 and 42. The max GPU temperature was 88C and idle 57C. All stock cooled.

7.1.09

First impressions

I went to sleep at 5 in this morning. It took a while to get the machine running properly and install Vista on it. Actually not more than maybe 2 hours, but the rest of the time I was just impressed how fast it is compared to my old machine (P4 @2.9GHz, Nvidia 6800 256MB, 2GB mem).

First it didn't start normally. It powered up, shut down just seconds after and then booted to BIOS giving error message about unrecognised CPU. After fiddling with bios a bit and setting up the RAID 0 I still had the occasional and quite frequent shutdowns. At this point I was getting a bit nervous. Then I saw the BIOS showing CPU temperature at 110C. That lead me to think that the BIOS has fault reading the temp sensors and shuts down because of that.

Luckily I had downloaded the latest BIOS and after disabling the CPU temp monitoring I was able to enter the BIOS flashing program. The EZ-Flash utility is the easiest one to use I've seen. After the BIOS update everything was fine.

Vista also had a little problem installing, but the fix was very simple. There was an option in BIOS to enable and disable the UPnP function for OS. I enabled it and got everything working.

Next in the process is to run a few benchmarks and slap a little bit of overclock on the machine. Not that I'd need that, but just to show off actually :D

6.1.09

Say hello to El Jefecito!

I've been very busy during and after christmas and new year. I hoped to finish the case build and to be able to install the parts and fire the thing up. Obviously this never happened.

I was able to make a lot of progress with the frame. I drilled all the holes and tapped the threads. There is about 50 holes and doing them with accu-drill wasn't fast or easy... I also tapped most of them by hand because the drill broke one threading tool in there. I was lucku to get it out. I also made some decorations for the exterior, but that's going to be revealed when the case is ready.

Holes for the wheels.


Furthermore I cut the grills and the exterior plates.


I found out that I made a mistake with the end plates and they lack some 20mm in width. That's not visible in this pic and I later found out that it shouldn't be a big problem.


I tried to paint the frame, but it was +2C in the "lab", so I couldn't get any paint out of the spray can.


So now all that I had to do over there is done and what's left I have to do over here. I packed all the stuff so I can work whenever I have time and not have to drive 100kms to get something done. I have a nice place ready (a basement which has a pub upstairs \o/ ) and I try to work a little bit in there this week.

Of course I forgot to take the tubing and some minor parts for the water cooling with me, but I can get them later. The watercooling is not a priority right now.

Why, you might ask. Well, because I have this:


Yes! I've finally put the parts together and as soon as I finish this entry, I'll start setting it up.

Here are a couple pics of the "wolf in sheep's clothing". The building was very easy and the parts fit in the case very nicely, altough I had to change one SATA cable to make the GFX card fit in. The 90 degree plug got in the way, so I put a straight one instead. I also changed the stock thermal paste from the CPU cooler to Arctic Alumina.

I had a computer specialist to help me, so maybe that's why everything went so smooth.


Notice the cool PSU. I thought it would be modular but unfortunately it is not. I have a bunch of cables to take care of and I'd rather not.


See how close the GFX card comes to the HDD rack. Take no note of the cable mess.


Just one little finishing touch by our specialist and we're ready to bolt the covers on this one.


Now I'm going to run a few tests with the build before the "warranty" of the MoBo expires to make sure it works ok.